Make a Sourdough Starter From Scratch {Easiest Method!}
This is the easiest method out there for learning how to make a sourdough starter from scratch. No discarding, No weighing, No failures, Zero stress. You will be making sourdough bread, desserts, and more in no time!
Materials
- 1/2 gallon glass jar
- ⅛ cup coffee scoop
- Liquid measuring cup
- A silicone spatula
- Something breathable to cover your jar.
- Flour of your choice; organic unbleached all-purpose white wheat flour is recommended; an heirloom grain option is Kamut All-purpose white flour which I purchased from The Food Nanny.
- Pure unchlorinated water. I am using my tested well-water, but if you live in the city where chlorine is added, you can just leave your water sitting out overnight on the counter and the chlorine will evaporate. Another option of course is to purchase purified water from the store.
Instructions
- Into your glass jar add 3/8 cup flour, using the coffee scoop, and 1/4 cup of water, using a liquid measuring cup.
- Stir thoroughly with a spatula or spoon until no lumps remain. The consistency should be like a thick pancake batter and will thin out a bit with time.
- If it is thick like sticky dough, add a few drop more of water and stir. Do this until you reach a thick pancake batter consistency.
- Place something on top of your jar that will allow for airflow, but won't let bugs in. I have used everything from cheesecloth with a rubber band to a napkin tied with twine, to a specially made jar cover.
- Place your starter in a warm place on your counter where you will remember to feed it. The temperature should be at least 70 degrees F in this location, but not over 80. If your kitchen is colder than this, then on top of a fridge or freezer, or in a room with a wood stove might be a better location. If your kitchen is hotter than 80 degrees F than you may have to feed your starter more often than twice per day when you are getting it started. Don't worry, it will only need this daily attention for the first month!
- In the evening, or about 12 hours after starting your starter, feed it in the exact same way: ⅜ cup of flour and ¼ cup of water. Stir well and cover.
- Continue feeding it each morning and evening for 4 more days in the exact same way.
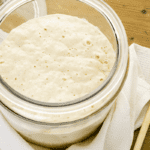
- Step On day 6, your starter should be lively and bubbly and ready for an easy recipe, such as a batter bread, but not quite ready to rise a regular loaf of bread. You can also use what is often referred to as the “discard,” in a recipe for something such as brownies, biscuits, or pancakes.
- On day 6, start by pouring your entire starter into your batter bowl. Take this opportunity to wash your container.
- Remove ½ cup of the starter, and put it back in the bowl or jar where it lives.
- Feed your starter its regular feeding and place it back in its warm place on your counter, making sure to cover the top.
- The activated batter or discard that you have removed is then ready for use in your discard recipe.
- You will continue this process for about 4 weeks, cleaning out your jar and using the discard every 6-7 days (or before it bubbles over if it is very active!). Don't forget to save 1/2 cup to keep your starter going!
Notes
- ”discard” is simply the starter you are going to remove from the starter container, and either use or give to your well-fed chickens. Discarding IS necessary unless you want to end up with a 5-gallon bucket of starter and spend a small fortune on flour. This is because when feeding your starter, the ratios of starter, to flour, to water need to remain around the same
- Also, don't be worried if you have only seen a few bubbles at this point. Make sure you are using unchlorinated water and organic flour (not mandatory, but will eliminate the possibility of pesticides or herbicides in the flour that may kill the natural yeast and it will also ensure that it is unbleached).