This post may contain affiliate links. Please read our affiliate disclosure.
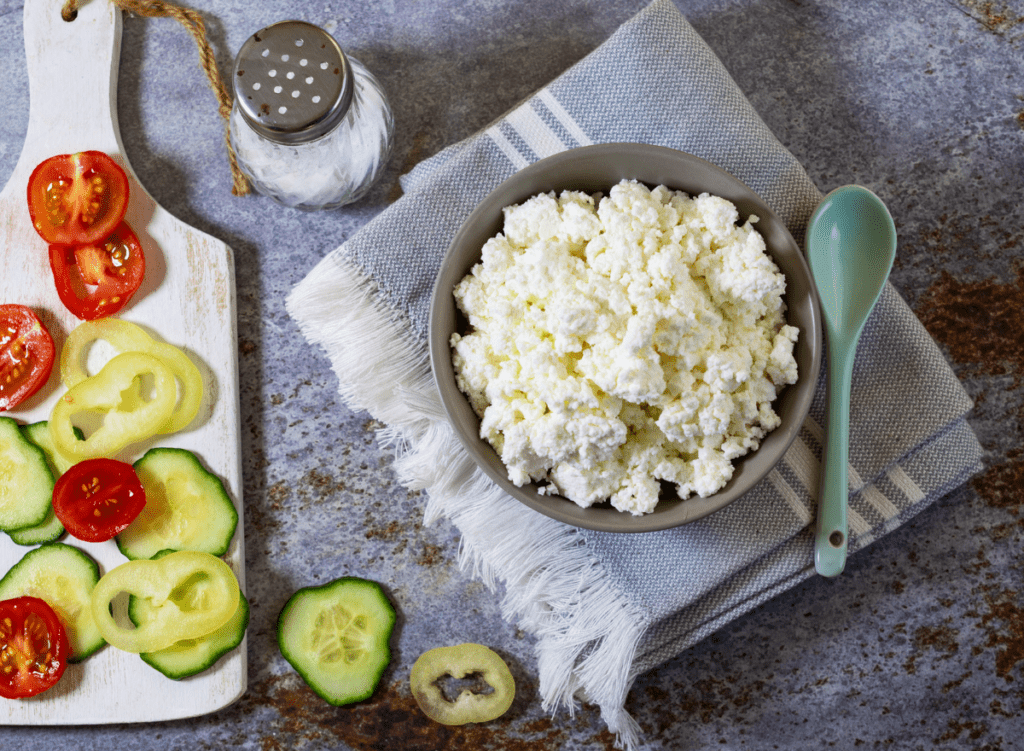
This beginner-friendly homemade farmer’s cheese recipe requires zero special ingredients or tools, can be made in a short amount of time, and can be customized to your taste preferences!
Making farmer’s cheese was my way of carefully dipping one toe into the world of cheese making. Let me tell you, I’m hooked!
If you have been wanting to try out making cheese and have been at all intimidated, this is the recipe for you. Farmer’s cheese is simple to make, requires no fancy ingredients, and tastes AMAZING!
What is Farmer’s Cheese?
Farmer’s cheese is a simple, homemade cheese that requires only basic ingredients and equipment. Any homesteading family that wants to stop using store-bought cheese can try this very simple cheese recipe and get the results I get.
Why You Will Love This Recipe
- Freshness and quality: Making cheese at home ensures it’s fresh and free from preservatives or artificial additives. You have complete control over the quality of the ingredients used, which results in a healthier and more natural product.
- Versatility and utility: You can use farmer’s cheese to make all kinds of savory dishes, Plus, you can repurpose the liquid byproduct of the cheese-making process, whey, for other culinary uses. Or even feed it to farm animals or use as a compost accelerator, reducing waste and squeezing even more value from the process.
- Easy to prepare: Homemade farmer’s cheese is remarkably simple to make, It needs just three basic ingredients—milk, white vinegar, and salt—and basic kitchen tools. The preparation method is easy to follow and doesn’t call for any specialized cheese-making knowledge or equipment. You’re about to access the best beginner-friendly cheese recipe.
- Healthy cheese at a cheaper cost: Organic or grass-fed cheese isn’t cheap. You can save a small heap of cash over time if you start making yours at home instead of buying it at the store.
This recipe was featured in the following video!
Tips for Making Farmers Cheese at Home
- Use fresh whole milk for a richer cheese and the best flavor and texture.
- Stir constantly while heating to prevent the milk from scorching or forming a skin on the bottom of the pot.
- Keep an eye on the temperature. Aim for around 200 degrees Fahrenheit, just before it reaches a full boil.
- Pour the vinegar in gradually while stirring to ensure even curdling and a consistent texture, then let the mixture sit undisturbed for about 10 minutes so the curds can form fully.
- To remove excess whey and get drier cheese, gently press the curds with a spoon, or twist the cheese cloth to squeeze out more liquid.
- Once shaped, refrigerate your cheese so it can firm up a bit.
- Always label and date the containers or bags to track storage time. Also, check the cheese for signs of spoilage, especially as expiration date nears. Notice signs such as an off smell, discoloration, or mold, before consuming.
Ingredients you’ll need for this recipe:
Tools or other supplies you may need:
How to Make Farmer’s Cheese at Home
- Add 1 gallon of whole milk to a large pot. I use organic milk (cow’s milk).
- Heat the milk slowly over medium heat. Stir continuously.
- When the milk gets to about 200 degrees (right before a boil, but not quite!), you’re going to add the vinegar. Pour slowly, stirring to combine.
- Stir slowly for one minute, then remove from heat and set aside for 10 minutes.
- Set your colander on top of another bowl or pot. Line the colander with a flour sack towel.
- Strain the whey and cheese through the lined colander. The whey that you catch in your bowl or pot is great for many things, so don’t toss it. At the very least, feed it to your chickens!
- Let the curds sit and drain for at least 10 minutes. You can also press gently and stir with a wooden spoon to encourage more of the whey to drain away from the curds.
- Next, with the curds still hanging out in the towel-lined colander, add 1 tablespoon of salt and stir. This is also when you would add any additional flavorings. Make sure you stir well, you don’t want to chomp down into a chunk of salt!
- Now, lift the towel full of curds, and, holding it over the pot, twist the top of the towel to squeeze out any remaining whey. Careful, it might still be hot!
- Wrap up the ball of curds in the entirety of the towel. Then massage and press the ball on a countertop, letting any remaining whey soak into the towel.
- Unwrap the towel and transfer the cheese to a glass loaf pan or container. Press down to shape.
- Refrigerate until firm. Or, if you can’t help yourself, sneak a bite of that warm cheese. You won’t regret it!
Pro Tip
Make sure you wash all of your equipment, including your towel, as soon as you can. As it hardens, it is near impossible to remove!
How to Store
Refrigeration: Place the cheese in an airtight container to keep it fresh and prevent it from absorbing other odors in the fridge. Or, wrap the cheese tightly in plastic wrap or wax paper, then place it in a resealable plastic bag or airtight container to extend its freshness. his cheese will last about 10 days in the refrigerator.
Freezing: For the best long-term storage, vacuum-seal the cheese before freezing to prevent freezer burn and maintain quality. Thaw it in the refrigerator for a day or two before use.
You can also wrap the cheese tightly in plastic wrap, then place it in a heavy-duty freezer bag, making sure to squeeze out as much air as possible before sealing. It can be frozen for up to 6 months this way.
Portioning: Divide the cheese into smaller portions and wrap each tightly in plastic wrap; store them in a freezer-safe container or bag. You’ll then thaw only what you need.
Recipe Substitutions and Variations
- Skip pressing the cheese curds and add in some cream to get cottage cheese, a creamier version with a lumpy texture.
- Instead of white vinegar, use lemon juice or citric acid as a curdling agent while giving it a slightly tangy taste. Replace the vinegar with an equal amount of lemon juice, or use 1 teaspoon of citric acid dissolved in a small amount of water.
- Incorporate fresh or dried herbs like chives, dill, or parsley into the curds for a savory flavor. Add in a bit of olive oil if you’re craving spreadable herbed cheese.
- Add spices such as paprika, garlic powder, or black pepper to the curds before pressing.
- For a sweet twist, mix in a small amount of honey or dried fruit.
Save this recipe for later by pinning it!
Farmer’s Cheese {Beginner-Friendly Cheese Recipe & How To}
Ingredients
- 1 gallon of milk
- 1/2 cup white vinegar
- 1 T salt
- flavoring ingredients of choice optional
Instructions
- Add 1 gallon of milk to a large nonreactive pot
- Heat the milk slowly over medium heat. Stir continuously.
- When the milk gets to about 200 degrees (right before a boil, but not quite!), you are going to add the vinegar. Pour slowly, stirring to combine.
- Stir slowly for one minute, then remove from heat and set aside for 10 minutes.
- Set your colander on top of another bowl or pot. Line the colander with a flour sack towel.
- Strain the whey and cheese through the lined colander. The whey that you catch in your bowl or pot is great for many things, so don’t toss it. At the very least, feed it to your chickens!
- Let the curds sit and drain for at least 10 minutes. You can also press gently and stir with a wooden spoon to encourage more of the whey to drain away from the curds.
- Next, with the curds still hanging out in the towel-lined colander, add 1 tablespoon of salt and stir. This is also when you would add any additional flavorings. Make sure you stir well, you don’t want to chomp down into a chunk of salt!
- Now, lift the towel full of curds, and holding it over the pot, twist the top of the towel to squeeze out any remaining whey. Careful, it might still be hot!
- Wrap up the ball of curds in the entirety of the towel. Then message and press the ball on a countertop, letting any remaining whey soak into the towel.
- Unwrap the towel and transfer the cheese to a glass loaf pan or container. Press down to shape.
- Refrigerate until firm. Or, if you can’t help yourself, sneak a bite of that warm cheese. You won’t regret it!
Video
Notes
How to Store
- Refrigeration: Place the cheese in an airtight container to keep it fresh and prevent it from absorbing other odors in the fridge. Or, wrap the cheese tightly in plastic wrap or wax paper, then place it in a resealable plastic bag or airtight container to extend its freshness. his cheese will last about 10 days in the refrigerator.
- Freezing: For the best long-term storage, vacuum-seal the cheese before freezing to prevent freezer burn and maintain quality. Thaw it in the refrigerator for a day or two before use.
- You can also wrap the cheese tightly in plastic wrap, then place it in a heavy-duty freezer bag, making sure to squeeze out as much air as possible before sealing. It can be frozen for up to 6 months this way.
- Portioning: Divide the cheese into smaller portions and wrap each tightly in plastic wrap; store them in a freezer-safe container or bag. You'll then thaw only what you need.
Recipe Substitutions and Variations
- Skip pressing the cheese curds and add in some cream to get cottage cheese, a creamier version with a lumpy texture.
- Instead of white vinegar, use lemon juice or citric acid as a curdling agent while giving it a slightly tangy taste. Replace the vinegar with an equal amount of lemon juice, or use 1 teaspoon of citric acid dissolved in a small amount of water.
- Incorporate fresh or dried herbs like chives, dill, or parsley into the curds for a savory flavor. Add in a bit of olive oil if you're craving spreadable herbed cheese.
- Add spices such as paprika, garlic powder, or black pepper to the curds before pressing.
- For a sweet twist, mix in a small amount of honey or dried fruit.
FAQs
1. What should I do if the cheese is too salty or not salty enough?
Season to taste by adding more or less salt, mixing well to ensure even distribution. If the cheese is too salty, rinse it gently under cold water.
2. What should I do if the curds and whey don’t separate properly?
Make sure that the milk reaches the correct temperature, and add the vinegar gradually while stirring. If needed, let the mixture sit a little longer so the curds can form fully.
3. How do I know when the milk is at the right temperature?
Heat the milk until it reaches about 200 degrees Fahrenheit, just before it begins to boil. You can use a thermometer for accuracy. Alternatively, watch for steam and small bubbles forming around the edges of the pot.
4. Can I use goat’s raw milk instead of cow’s milk?
Yes, you can use fresh goat’s milk instead of cow’s milk.
5. Why Am I getting dry and crumbly cheese?
You likely cooked the curds too long, which dried them out a bit more. Just watch the temperature closely and avoid stirring for more than a minute before removing the pot from the heat.
Isn’t that easy?! You now have zero excuses for not making farm cheese, and absolutely no reason to continue spending money on grocery store cheese. All you need are simple ingredients such as fresh milk, white vinegar, and salt. Go try it out and tell me what you think. Also, I’d love to hear your flavoring combination ideas!
Did you make this recipe?
Please leave a 5-star review so that others can try it as well! Mention us @thefromscratchfarmhouse on Instagram so we can see your creations! You can also leave a comment below!
For even more delicious recipes, you may like these:

Name of another post title

Name of another post title

Hi Stacy
I made your cheese and it tastes sooo good. How do you form it? Mine is very dry and crumbly, I was not able to form it into a ball or the loaf pan.
Thanks for your help
Laura
I’m so glad you liked it! I’m guessing that you just cooked the curds too long and so it dried it more than mine. Just watch the temperature closely and make sure you are not stirring for more than a minute before removing from the heat.
Does it matter what kind of milk we use? Cow/goat?
I’ve never tried this recipe with goat’s milk, but it should work fine! If you try it please let me know how it goes.
I have made this several times, using goats milk. It’s great!!!
This cheese recipe is super easy! I have used vinegar and I have used lemon juice. Both worked great. The taste was a bit different. My family really liked this cheese.
I am trying this with my raw goats milk. I have been letting it sit for almost 10 minutes but I have no curds…what can I do?
It can take longer to set up. This is a late response, sorry, but hopefully, it worked out!
Is it supposed to curd before you put the vinegar in? Mine was curdling up the hotter it got.
No, it shouldn’t curdle before adding the vinegar. Make sure you’re heating it gently and not letting it get too hot too fast. The vinegar helps in curdling, so it’s key to add it at the right time. If it’s curdling too early, try lowering the heat a bit.
Can you use raw cows milk?
Yes, although after heating it, it won’t really be “raw.”