This post may contain affiliate links. Please read our affiliate disclosure.
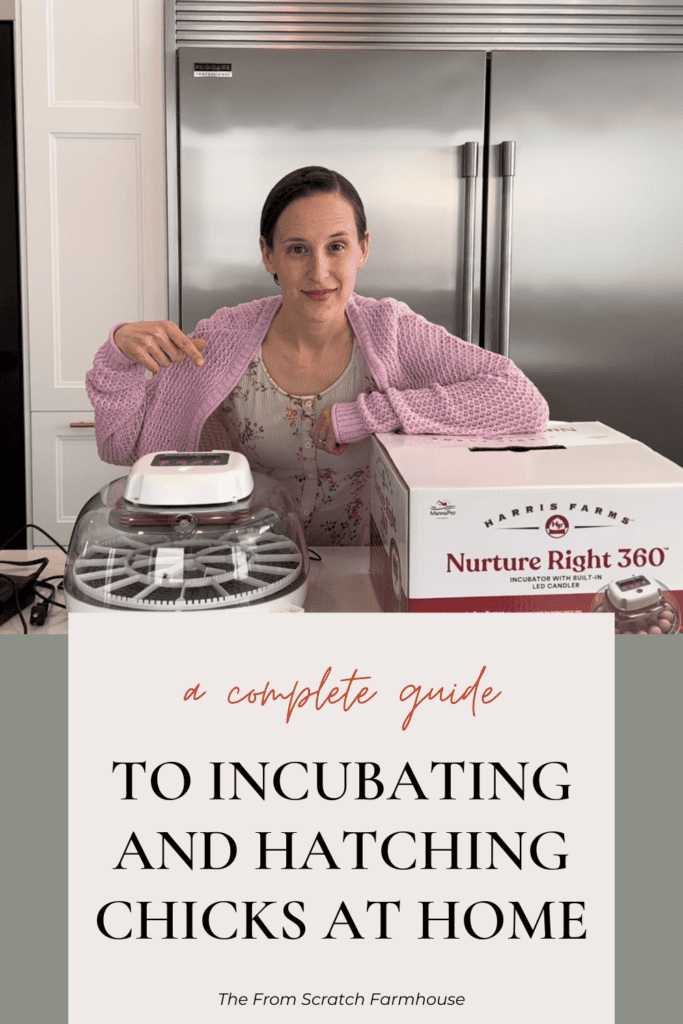
my favorite method for adding baby chicks to our backyard flock is incubating and hatching them at home. This complete guide walks you through how to hatch chicken eggs. Also, my review of the Nurture Right 360 will explain how this incubator helped us get our best hatch rate yet!
Spring is finally officially here! And what says spring more than new baby chicks?
One of my favorite spring projects is hatching chicks. Watching this miracle unfold before your eyes is something I don’t think anyone could ever get old of.
I’m going to go over exactly how to incubate chicken eggs so that you too can hatch baby chicks on your homestead without having to rely on purchasing chicks from hatcheries or farm stores.
I’m also going to give my review of our favorite chicken egg incubator, The Nurture Right 360. This incubator is best for those who are just doing this on a hobby level as backyard chicken keepers looking to grow their own flock and don’t want to spend a fortune.
If you would prefer, you can watch this tutorial and review in the video below.
Why should you hatch chicken eggs instead of buying chicks?
Ok, before I go through the step-by-step process of hatching your own chicken eggs, let’s talk about why you would even want to do that. After all, day-old chicks are pretty inexpensive to purchase at feed stores.
I would say that the number one benefit, in my opinion, is the opportunity to experience the process and share it with your children or others. We like to take the opportunity to teach our kids about life cycles and chicken development.
I will go over this in a bit, but you can actually watch the developing embryo by doing what’s called candling. Then, watching them hatch is an amazing learning experience that, even as an adult, I really look forward to.
As a homeschooling family, I find that these projects are one of the best ways to learn!
The other major benefit is to create what is called a closed flock. This means that you are not bringing in birds from off of your farm, and therefore, you are not bringing in diseases or health problems that you are not already dealing with. This is one aspect of farm biosecurity, and honestly, it’s not something I gave much thought to as a new homesteader.
After some years of experience, I have realized how much money, trouble, and heartache keeping a closed flock, or a closed herd in the case of your goats or your cows, can save.
Hatcheries inevitably face issues with diseases that you don’t want to bring home to your farm if you can help it.
I should point out that at this point, we are still purchasing our meat bird chicks because we like cornish crosses, which cannot be hatched at home. Also, we don’t hatch our own turkeys. So maybe you’re wondering how this biosecurity thing might play out if you do choose to introduce outside chicks or poultry at some point. There are two ways to handle this.
First, you should always quarantine your new birds, no matter how old they are or where they came from. A one-month separation from your established flock is the usual recommendation.
Also, it is a good idea, if you have the ability to do so, to keep separate flocks. So an example of this is that we keep our meat birds far away from our laying hens so we don’t have to worry about them sharing germs.
A third benefit to hatching your own chicks is, of course, self-sufficiency. It is pretty satisfying and even comforting to know that you can replace your flock over time and maintain your egg and meat supply without having to depend on others to supply you chicks.
The fourth benefit is financial savings. While chicks don’t cost much, the savings of hatching your own chicks over time is sure to add up.
Why incubate eggs using an incubator instead of a mother hen?
I used to wonder why homesteaders didn’t just let a mother hen hatch out her young instead of going to the trouble of using an incubator. There are three main reasons. First of all, a broody hen, which is a hen that is willing to sit on her eggs, is not something you can necessarily predict or control. Many hens will never become broody. Others give up on the job halfway through. It is not as simple as putting some eggs under a mother hen and hoping she does her job well.
Also, in our experience newly hatched chicks are very vulnerable in a coop setting. Other hens and roosters have been known to eat chicks while their mother was away for just a few minutes.
Finally, unless the mother hen is kept in separate living quarters, other hens may continue to add eggs to her clutch. You would have a hard time determining which eggs were freshly laid and which ones were her developing chicks.
While I generally think mother nature knows best, we personally prefer to keep our hens producing eggs for consumption while we handle incubating the new chicks for our flock of chickens.
Alright, so we covered WHY you would want to hatch your own chicken eggs, now let’s dive into the how.
This post contains affiliate links, which means I make a small commission at no extra cost to you.
How to Hatch Chicken Eggs Using an Incubator
Don’t worry, I know there is a lot of information to take in, so to make it easy for you I have created an Easy Guide to Hatching Chicks at Home printable! It doesn’t cover everything here, but is to be used as a quick reference guide.
What do you need to incubate and hatch chicken eggs at home?
Ok, let’s start by going over exactly what you will need.
1. Clean, fertilized, and unwashed chicken eggs.
First of all, you are going to need hatching eggs. If you have laying hens already and a sufficient ratio of roosters to hens, you can simply collect the hopefully fertilized eggs over a period of one week in a cool spot.
I’ve read that the ideal temperature for storing eggs for incubation would be between 55 – 60 degrees F, but I will say that I have successfully hatched many eggs kept at warmer temperatures closer to 70 degrees F. The one caveat being they did hatch over a pretty long period of time since some had begun to develop prematurely, which is not ideal. Also, do not keep them in the fridge- this would be too cold. You should also not start eggs in the incubator at different times.
The eggs should be clean, but don’t think that you can wash them to get them clean, they need to be laid and collected in this state. If you were to wash the egg, it would remove the protective coating called the bloom and your chicks would be more susceptible to illness during development. Dirty eggs will also contaminate the incubator and allow bacteria to grow which may lead to unhealthy chicks. In a pinch, I do use a dry paper towel to gently remove small areas of dirt or poop.
Don’t keep any unusually small eggs or eggs with strange shapes or features. Pick the best for a successful hatch rate and healthy chicks!
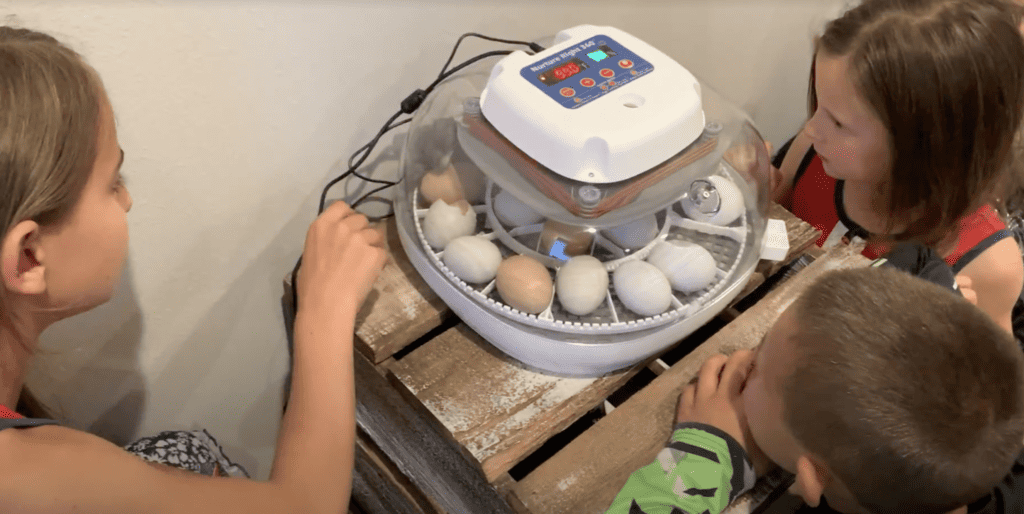
Also, I highly suggest filling the incubator that you have to capacity. There is inevitably some amount of loss, so there is that to consider, but also chicks actually encourage and help the hatching process of one another. At a minimum, you should hatch 6 eggs at a time. I personally never start the incubation process with fewer eggs than can fit in my incubator.
To store the fertile chicken eggs while you are waiting to incubate them, I recommend a clean egg carton. The eggs should be stored with the larger end facing up and the pointed end facing down.
If you don’t have access to your own fertilized chicken eggs, you will have to find a source to purchase them. I recommend checking local Facebook groups, but you can also buy them from a hatchery.
Also, you cannot incubate eggs purchased from grocery stores. They are most likely not fertile and have been washed (at least in the United States).
2. An incubator
Ok, so you have the most important part, the second item you will need is an incubator. I have used two different incubators. The one I had for years was made of styrofoam and often sold at farm stores as basically, the economy model, which is why I bought it. Unfortunately, I was never able to get a good hatch rate with that incubator. For a long time, I even gave up on the idea of hatching chicks because I thought it was just too hard or that I wasn’t good at it.
Nurture Right 360 Incubator Review
When I got the itch to try it again I decided to make an investment in an incubator I had seen others using with a lot of success, the Nurture Right 360. It is still relatively cheap compared to fancier models. Right now you can get it on Amazon for under $200.

Nurture Right 360
Our favorite incubator for hatching chicken eggs at home!
I have been so impressed by this incubator!
It is on the more affordable end of automatic incubators, yet it gently turns the eggs with perfect timing throughout the incubation period, automatically stopping the rotation 3 days before hatching begins. Without an automatic egg-turner, you are stuck manually doing the egg turning several times each day.
It also maintains the correct humidity levels with little effort on my part, and it maintains a consistent temperature.
This incubator is also a forced-air incubator vs. a still-air incubator. This means that there is a fan to maintain air flow. Purchasing this type of incubator is the easiest way to increase your hatch rate.
The temperature and relative humidity are displayed on the outside and the instructions that came with it give clear directions on what to do to adjust either one. You can manually set the temperature. Then, for humidity control, you simply open or close the little ventilation window or add more water to the water reservoir.
It even has a very easy-to-follow system for increasing the humidity on the correct day in the incubation period. The instructions say that when there are 3 days left, you simply remove the plug on hole B, and fill it with water the same way you have been filling hole A.
My favorite part of this incubator was the ease with which you get to see the whole hatching process. My kids and I can spend hours just watching for the first signs of pipping to the final triumphant hatch.
I would say that the one big downfall of this particular incubator is that it is not ideal for hatching larger eggs like ducks. We tried to hatch ducks at one point and most of the duck eggs I had collected were too big to fit in the automatic egg turner.
I have since found that there are companies making automatic turner trays that are compatible with the Nurture Right 360 for larger-sized eggs, so this might be an upgrade we will look into in the future.
3. Chick Brooder Setup
Ok, so you have your eggs and the incubator, the other things you will need are actually for when the chicks hatch in 21 days, and this is your brooder setup.
You can put this together during that 21-day incubation period, however, I would encourage you to not be like me and only think about setting up your brooder after the chicks are already hatching!
They will fairly quickly need taken out of the incubator and moved to a safe warm place where they have access to food and water, so let’s chat brooder setups for a minute.
A brooder does not have to be fancy. We have used everything from a Rubbermaid tote to a child-size pool. But here are my thoughts…
Don’t use anything really flammable, such as a cardboard box since you may be needing a heat lamp.
The kiddie pool was not a great idea. The chicks quickly were able to hop out and making walls around the outside was more trouble than it was worth.
Our best setups have been extra large plastic storage totes and large galvanized troughs. The troughs are what we currently use, but I realize those aren’t cheap, so in a pinch, use the totes, or rig up your own brooder box with some scrap wood.
For bedding, I prefer pine shavings. I have tried other chick-safe bedding choices but always come back to the pine bedding. Just do not use cedar shavings, as the dust from this can make your chicks sick.
For the first day or so I also put down a few pieces of newspaper. This allows me to sprinkle some food on the paper to encourage them to start pecking and eating without them trying to eat the bedding.
For heat, I have found that I LOVE the brooder heating plates. These are a lot safer than heat lamps and seem to work well. However, I did not find them to be enough heat for the first few days. You obviously can’t put the food and water under them, so the chicks would get chilled if they came out to eat or drink, as they can’t yet maintain their body temperature.
My solution has been to use a heat lamp for the first few days on one end of the trough over the food and water and the heating plate on the other end. Then, after a few days, I switch to just using both at night when it’s colder. Then after that, I get rid of the heat lamp entirely and by then they are old enough to just warm up under the warming plate when they need it and I can stop worrying about the heat lamp.
If you do go this route, I highly suggest purchasing one with a top designed to keep the chicks from climbing on top as it is not fun to clean.
You will also need a chick waterer and feeder. These are sold at your local farm store for very cheap. You can also rig up your own, just keep in mind that baby chicks can easily drown in an open water source and it’s best if they can’t climb in the feeder or they will contaminate it.
We even put rocks in the waterers for the first few days because I have seen chicks drown even in the waterers designed for this purpose. We remove the rocks after a few days since they do make refilling the waterers more time-consuming.
Other things to consider when setting up your brooder are protecting them from other animals and picking an ideal location.
We have set up the brooder in our mudroom, and our garage in a different house, but just a heads up, they put off a TON of dust. You will be amazed how quickly there will be a ½” of dust on everything in the room they are in.
Now, you do need a location that doesn’t experience huge swings in temperature, so the best location for you may be inside, or in an outside building that doesn’t get any drafts. We have also set up our brooder on our front porch in warm weather and that worked fine as well.
If there are any animals, including cats that might get into your brooder, you are going to need a top right away. We have just used chicken wire and some clamps for this. Eventually, the chicks will start to fly out anyway, so whether or not you have to provide protection for them at the start, you will need a way to keep them in when they get older.
Ok, so just to review, you have your clean fertile eggs, your incubator, and your brooder ready to go… let’s incubate those eggs!

brooder heat plate

chick feeder

chick waterer
Steps to Incubating and Hatching Chicken Eggs
Step 1: Start by setting up your incubator. It should be set up in a draft-free room that maintains a consistent room temperature. Also, the incubator should never sit in direct sunlight.
Step 2: Next, you will want it to get to the correct temperature and humidity before adding your eggs. The ideal incubator temperature for hatching chicken eggs is 100.5 degrees F. At any point in time, you don’t want the temperature to fall below 99 or above 102. Forced-air incubators should be set at 99.5 F to best achieve this ideal range, while still-air incubators should be set a little higher at 100.5. Both low and high temperatures can cause the embryos to die.
The ideal humidity is 50 – 55 % for the first 17 days. We’ll talk about what the humidity should be in the last few days in a little bit. Follow the instructions on your particular incubator to achieve this. Mine just involves turning it on, making sure the temperature is set right, and adding water to the correct hole.
There may also be a way to adjust ventilation. Be careful, because increasing ventilation is going to decrease humidity, but don’t just assume you can keep ventilation windows closed. On mine, it is kept ½ way open for the first 17 days. Ambient humidity can greatly affect this, so make sure to check on it often. The water will need to be refilled almost daily.
Step 3: Once you have seen that you are capable of keeping the incubator at the right temperature and humidity, go ahead and add your eggs. If you are using the Nurture Right 360 or a similar model, you will place the large end of the egg towards the middle. Following the manual’s instructions, test the egg turner to make sure that any large eggs turn properly. You will then keep an eye on the temperature and humidity to make sure it comes back to the right levels.
Step 4: On my incubator, there is also a countdown timer so that you can easily keep track of the days of incubation. This needs to be set to 21 days from the time you added the eggs, so go ahead and adjust that if need be. The instruction pamphlet gives clear instructions on how to set this number.
Note: Most incubators these days have automatic turners. If you are doing this manually, draw an x with a pencil on one long side (not the ends) of each egg. Then 3-5x/day quickly reach in to rotate the eggs 180 degrees so that the opposite side of the egg is facing up. You will want to do this an odd number of times throughout the day so that the direction the egg is facing overnight changes daily.
It is also a good idea to wear gloves or have thoroughly washed hands when doing this and to work quickly so that the temperature and humidity can be restored as soon as possible.
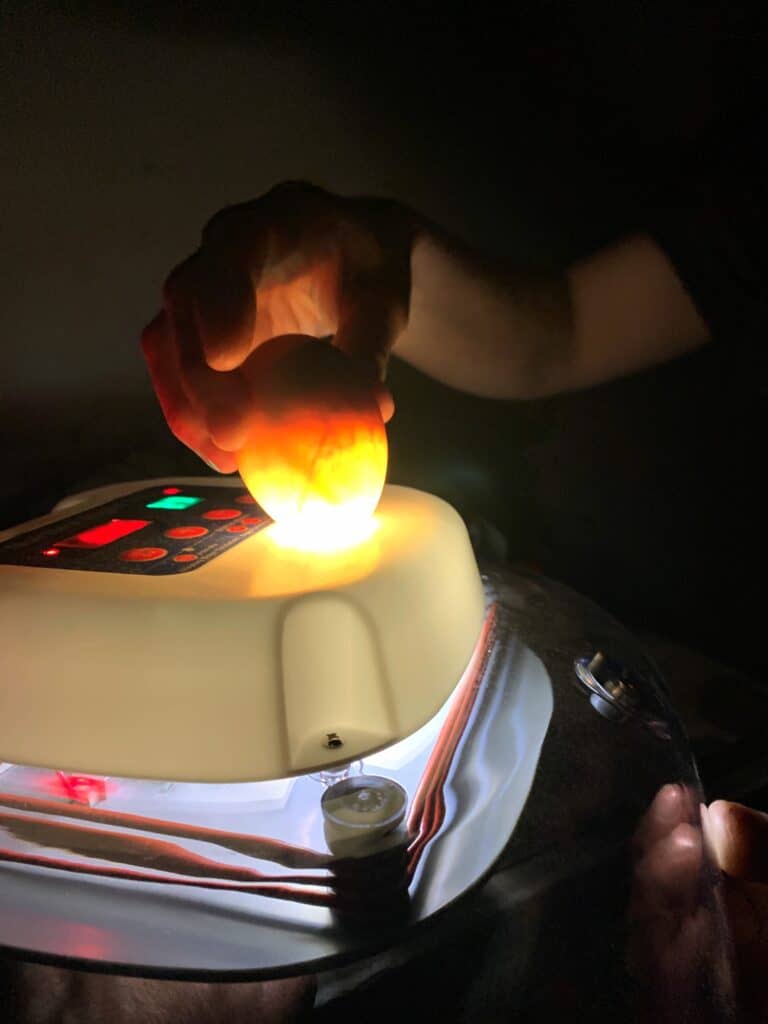
Step 5: On day 10 of the incubation process, it’s time to do a fun and actually very beneficial process of candling the eggs. Candling is when you put a light up to the egg in a dark room and get to peek inside.
If you are doing this with kids I highly suggest going over the development of a chick ahead of time so they will understand what they are looking at. And actually, this applies to adults too if this is your first time going through the process.
The Nurture Right 360 actually has a bright light on the top for this purpose, which is really handy, but you can use a flashlight too.
With the lights off and the room dark, place the light source directly up against the egg to make the inside glow.
Here is what you are looking for…
If the inside of the egg is clear and you don’t see any visible structures or dark areas, the egg was likely infertile or died really early along. If you see this, go ahead and remove the egg from the incubator.
Removing non-developing eggs will keep them from potentially spoiling in the warmth of the incubator. I’ve heard stories that they can explode, but at the very least they will smell, so it’s best to get rid of them. Removing these non-developing eggs is the practical purpose of candling in the first place.
If you see a red ring in the egg, there was an embryo at one point, but it has since died. You should also remove these eggs.
If you see blood vessels in the egg, there is a live embryo. You should also be able to see a dark spot, which is the large black eye of the developing chick. If you’re lucky, you may even see feathers or movement! A darker-colored egg shell may be more difficult to see through in my experience, but you can usually see enough to see if the embryo is viable. You should also see a clear space at the top of the egg. This is the air sac (or air cell), which will continue to get smaller until the chick hatches.
You can also candle an egg on any day up until day 18, but be careful. Opening your incubator or messing with the eggs too often can negatively affect your hatch rate.
Step 6: Day 18 is the start of what is called lockdown. You should stop rotating your eggs, and if you have an automatic turner, it may automatically stop for you. You also need to raise the humidity at this point to 70%. On my incubator, this just involves adding water to water hole B. On mine, the instructions also say to increase ventilation by opening the little window all the way.
As the name suggests, lockdown also means you should not remove the lid of the incubator until hatching is over. This is because a quick drop in humidity could essentially shrink-wrap the chick into its egg.
I unfortunately have learned this the hard way, not even by removing the top, but just by letting the humidity drop, so watch it carefully during those last days. A partially hatched chick that can’t be helped is a horrible situation to watch unfold.
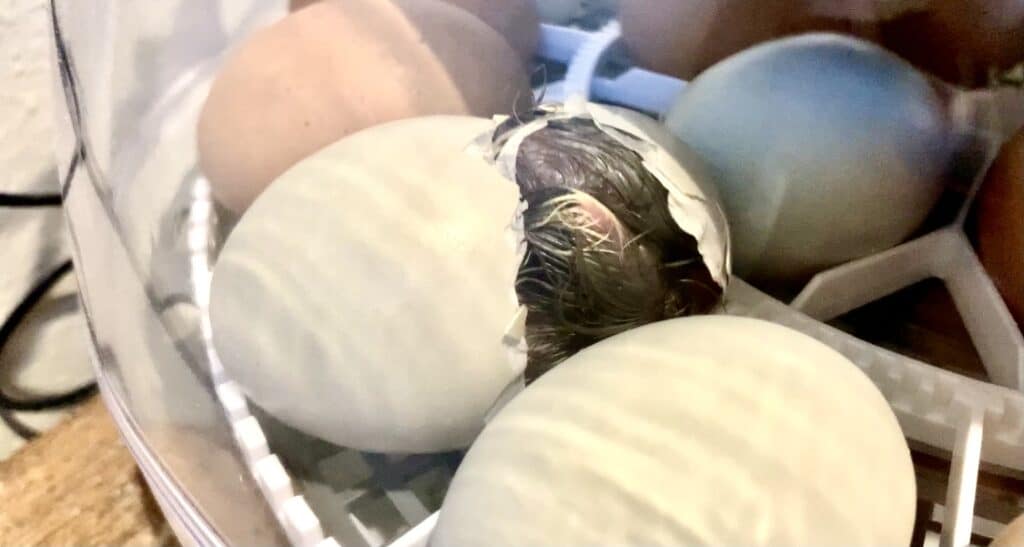
Step 7: Around day 21, your chicks should start to hatch. You will first notice a small hole, called the pip hole, and as soon as you see that the chick should hatch in the next 24 hours. There is a pretty large range of normal as far as how long it takes. I have seen chicks hatch very quickly from start to finish and others take a full 24 hours.
Just whatever you do, resist the urge to open the incubator or to try to help them come out of their shell. There may be blood vessels still attaching them to their shell and pulling it off prematurely can cause fatal bleeding.
Step 8: Once your chicks start hatching, it is a good idea to make sure your brooder space is set up and you may want to turn on your heat source so that it has time to warm up. The temperature of the brooder should be between 90 and 95 degrees F. Fresh slightly warm water should be in the chick waterers along with some chick feed in the feeders. I like to place some newspaper on top of the shavings for the first few days so that I can scatter some feed to help encourage the new chicks to eat.
One of the cutest things to watch is how the cheeping and pecking of the newly hatched chicks actually encourage the others to hatch as well. I’ve even seen chicks go over and peck at the pip hole of another egg like they knew what they were doing.
It is completely safe to keep the new chicks in the incubator for a day or so after hatching, as they can rely on their yolk for nutrition and hydration for up to 72 hours. So just let them hang out in the incubator to cheer on the others. Once the oldest chick hits the 2-day mark, you may want to go ahead and sneak them out if there are others that you think may still hatch.
By day 24 there are probably no more viable eggs left, but you could candle them quickly to check before giving up completely on unhatched eggs.
By this point, all of your hatched chicks should be happily enjoying their new brooder. Keep an eye on their behavior such as crowding (too cold), or avoiding the heat source (too hot) to make sure they are being kept at a good temperature.
Also, make sure to clean your incubator well before storing it away. Use warm soapy water on any waterproof components. The rest can be carefully wiped down with a slightly damp rag.
Alright, I think I covered how to hatch chicks from eggs pretty thoroughly, but if you do think of other questions, please feel free to leave them in the comments and I will do my best to respond. Also, if you have any additional tips or things I forgot to mention, it would be great if you could leave those for others there as well.
Incubating and hatching eggs at home can be hard work, but I personally think it is an experience worth repeating year after year.

Planning to incubate and
hatch chicks in the future?
Incubating Chicks FAQs
Is there a way to hatch only female chicks?
No. Unfortunately, you cannot determine the sex of an undeveloped or unhatched chick. You can expect to get several roosters in each batch. If you choose not to keep them, you can certainly rehome them, or eat them before they ever crow their first crow or become aggressive.
Will the chicks still hatch if there is a power outage?
It depends. The low temperatures may cause the developing embryos to die if the power outage goes on for more than an hour. The first thing I would suggest you do as soon as you lose power would be to wrap the incubator in a few bath towels to try to maintain the warmth. Just be careful not to block off the ventilation hole! Also, in the future, I would suggest not trying to hatch eggs during seasons when power outages are common in your area.
Can I incubate our own eggs if we don’t have a rooster?
No. Without a rooster you will not have fertilized eggs, which means they cannot develop into chicks.
Can you make money hatching chicks at home?
Some people do, but it is unlikely that you would make much unless you are willing to invest in a commercial-size incubator. Also, selling either the hatching eggs or chicks from a rare breed of chicken will be worth significantly more.
Is it possible to hatch eggs in a homemade incubator?
There are plans available online for constructing a homemade incubator, but I personally don’t recommend it. If you were to construct one with such features as an automatic egg turner and fan, you would spend almost as much as a proven store-bought model.
Can I use an incubator if my house doesn’t stay at a constant temperature?
Yes, most incubators are able to maintain a proper temperature, even with changes in the ambient temperature. Just make sure that direct sunlight isn’t hitting the incubator and that there are drafts that would let in cold breezes.