This post may contain affiliate links. Please read our affiliate disclosure.
Healthy homemade lunch meat made with roast venison or beef. This easy from-scratch swap will have you never looking back to its slimy store-bought counterpart.
Over the years we have gone back and forth on whether we keep lunch meat in our home.
It’s delicious. It’s handy to have on hand. It’s a quick and easy protein source. But it’s also made with we-have-no-idea-where-it-came from meat, it’s expensive, and it has a tendency to be…
Slimy. You know what I’m talking about.
Did you know that store-bought lunch meat has a very high probability of containing listeria? Thankfully, this bacteria rarely makes people sick, but for those who are pregnant or have a weakened immune system, this can be very serious.
Overall, I’m very happy that we have found recipes to make our lunch meat from scratch and no longer have to purchase it from the store.
This recipe will walk you through exactly how to make roast venison or roast beef lunch meat, but if it’s turkey lunch meat you are looking for, hang on because that recipe is coming to the blog next week!
To make this recipe you will need a hind quarter roast, or 2 or 3 depending on how much you want to make at a time. If you only have other roast cuts on hand, that will work too.
To start, you are simply going to create a brine in a large bowl, place the roasts in the brine, and then cover and refrigerate for a few days.
After you have made the brine, whisk until well combined. Place the roasts in the bowl. Cover and refrigerate.
The brine will penetrate the meat about ½” per 24 hours, so we did 5 days, but adjust as needed.
After the meat has brined, wrap the roasts individually in foil. If you have oven-safe meat thermometers (highly recommend!), insert the probes before wrapping.
Smoke or bake the roasts to an internal temperature of 160 F, or whatever the safe temperature you would normally cook your meat to. We do ours in our pellet grill at 200 degrees for 4-6 hours, which adds to the wonderful flavor. If you are baking it, just do a low temperature until done.
Let the meat cool a bit, then cover and chill for at least 12 hours.
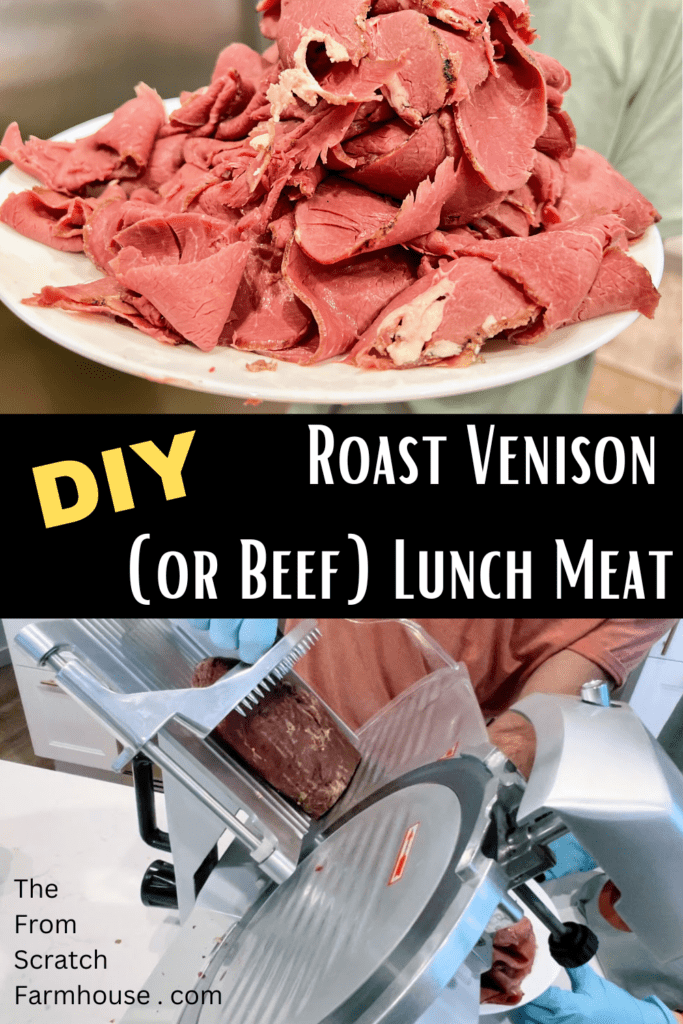
Finally, it’s time to slice the lunch meat! We use our slicer, which has been such a handy investment, but another way to do this would be to use an electric knife.
Lunch meat freezes well, so go ahead and separate it into portions big enough for your family and freeze them for longer storage. That is if you don’t eat it all on the same day. Trust me, it’s tempting.
Homemade Roast Venison or Beef Lunch Meat
Ingredients
- 3-5 pound hind quarter roasts
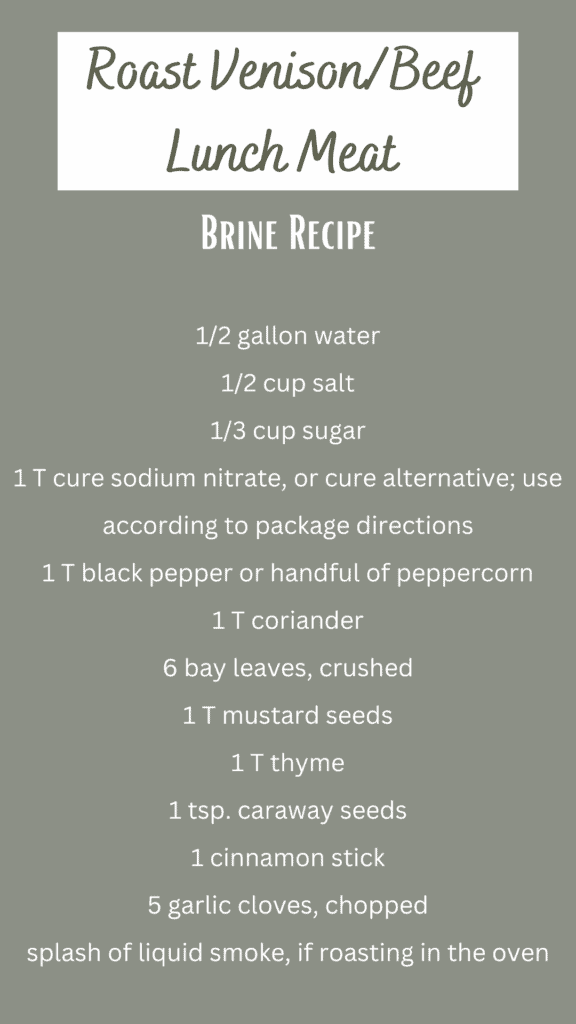
Brine
- 1/2 gallon water
- 1/2 cup salt
- 1/3 cup sugar
- 1 T cure sodium nitrate or cure alternative; follow package instructions for alternatives
- 1 T black pepper or handful of peppercorns
- 1 T coriander
- 6 bay leaves crushed
- 1 T mustard seeds
- 1 T thyme
- 1 tsp. caraway seeds
- 1 cinnamon stick
- 5 garlic cloves chopped
- splash of liquid smoke if roasting in the oven
Instructions
- Add brine ingredients to a large bowl.
- Add roasts to brine.
- Cover and refrigerate for 24 hours per 1/2 inch of thickness.
- Wrap each roast individually in foil. If you have an oven-safe temperature probe, insert that before wrapping.
- Smoke at 200 F for 4-6 hours or until the meat reaches 160 F.
- If using the oven instead, bake at a low temperature until done.
- Let the meat cool a bit, then cover and chill for at least 12 hours.
- Slice thin using a meat slicer or electric knife.
- To store longer than a week, freeze in family-sized portions in a freezer-safe bag or container.
Want to watch us make it? Check it out in the video below!
Hi! How necessary is the nitrate/cure? I’m trying to avoid nitrates, though I don’t honestly know much about it’s purpose in the meat.
Unfortunately, there is a lot of misinformation out there about nitrates. Nitrates are naturally occuring, so this is not something you can avoid entirely. If you would like to substitute for naturally occurring nitrates (celery salt cure) you can do that. You could leave out the curing salt, but in that case it is just cooked meat and must be treated accordingly, not like lunch meat.
We just made this and the flavor is delicious! But it is almost a kind of pasty texture. Any thoughts to why?
Thank you so much for sharing your experience! I can only imagine how tough that must’ve been with the salt water—yikes! I’m so glad you found an electrolyte tablet that works for you. This homemade version should definitely mix things up a bit for you, and it’s great that you can tweak it to suit your needs. Potassium really is a game-changer when it comes to electrolytes, isn’t it?
I appreciate your kind words, and thankfully, my health has stabilized. I hope this drink helps add some variety to your routine! 😊
This recipe is amazing! I used venison sirloin tips, followed the recipe with the exception of using coconut sugar in place or sugar and used fennel and anise seeds instead of caraway seeds. I also did not use liquid smoke because I smoked the meat. I got to an internal temp of 135 as not to dry out the meat and it came out great. It’s amazing how much better the meat tastes than store bought lunch meat. I’ll used this recipe from now on and will not be sending that cut to grind like I did in the past, I have really been missing out!!
I’m so glad you loved it!
Is the T teaspoon or tablespoon?
Capital T is tablespoon.