This post may contain affiliate links. Please read our affiliate disclosure.
Mozzarella Cheese Recipe that’s easy to follow and gives amazing results every time. Learn to make homemade mozzarella cheese from scratch today!
Have you been wanting to learn to make mozzarella cheese from scratch, but are intimidated by the process? This is the easiest tutorial you will find, and it consistently gives amazing results. Use it to make homemade string cheese, mozzarella cheese sticks, top a top a homemade pizza, or just eat it straight.
When I first started looking at how I could make more of our meals from scratch, making homemade mozzarella got added to my “learn to make” list. The problem was that every tutorial and recipe I came across (even ones claiming they took 30 minutes) was very intimidating.
Many of the methods for making quick mozzarella cheese also required using a microwave. For many years, we didn’t own a microwave. We now have one, but we prefer not to use it.
Finally, when we got a milk cow, I dove head-first into the world of cheese making. After learning the basics of cheesemaking with hard cheeses like cheddar and Colby, I decided to master mozzarella. After all, it was supposed to be the easy one!
Following several failed attempts and a ton of experimentation, I have learned to make amazing mozzarella cheese. The best part though is that I have simplified the process!
No rubber gloves, microwaves, or complicated steps are needed for this method of making mozzarella cheese. You will be whipping up a fresh batch for your next family pizza night and your family and friends will be amazed..
* As an Amazon affiliate, I may earn a small commission if you choose to purchase through my links at no extra charge to you.
What is Mozzarella Cheese?
Mozzarella is a soft, fresh cheese with a mild flavor and smooth texture. It melts beautifully and is commonly used in pizza, lasagna, and caprese salad. Often enjoyed fresh, its creamy taste and stretchy consistency make it perfect for cheese sticks or string cheese. Its versatility and light flavor make it a staple in both traditional and modern cuisine.
Why You Will Love This Recipe
Fun and easy to make: This mozzarella recipe is simple and enjoyable, turning cheese-making into a hands-on, satisfying experience. The straightforward process means you can whip up fresh, delicious cheese without stress, perfect for any skill level.
Versatile for any meal: Whether you’re topping pizza, enjoying it as a snack, or mixing it into pasta or salads, this cheese adapts effortlessly to whatever you’re cooking.
Convenient for Storage: Mozzarella cheese freezes well, especially when shredded, making meal prep a breeze. You can have fresh, homemade mozzarella on hand anytime without sacrificing flavor or quality.
This recipe was featured in the following video!
Tips for Making Mozzarella Cheese
- Check for clean break: After adding rennet and letting the rennet mixture sit for 15 minutes, check if the curd has set by performing a “clean break” test with a knife. If it’s not ready, let it sit for another 10–20 minutes.
- Use hot water for stretching: After draining the excess whey, cover the curds with hot water to help them separate. Repeat this process before adding salt and forming the curds into a ball. Stretch the curds by dipping them into the hot water and pulling them until they reach a stretchy consistency with a glossy appearance.
- Gradually heat the milk: Heat the milk slowly to 100°F over medium heat, stirring occasionally to prevent scalding. Use an instant-read thermometer to monitor the temperature.
- Ensure you let the cheese curd set properly before cutting. If the curds are too fine and don’t form large chunks, it may be because they didn’t set long enough.
Ingredients you’ll need for this recipe:
Tools or other supplies you may need:
How to Make Mozzarella Cheese
- Add 1-4 gallons of milk to a large, nonreactive pot.
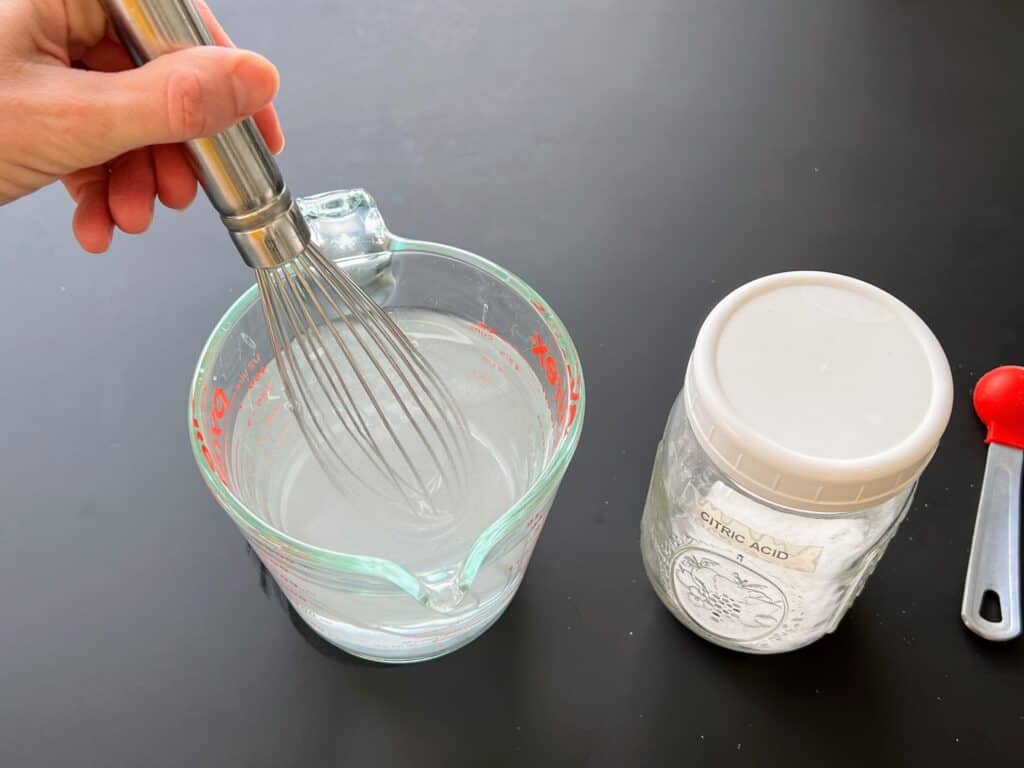
- For every gallon of milk, dissolve 1-1/2 tsp. citric acid in 1/2 cup of water.
- Stir to combine. Then evenly add the dissolved citric acid to the milk.
- Stir the milk in an up-and-down motion to blend well.
- Turn the heat to med-low and slowly heat up the milk to 100 degrees F. Stir occasionally.
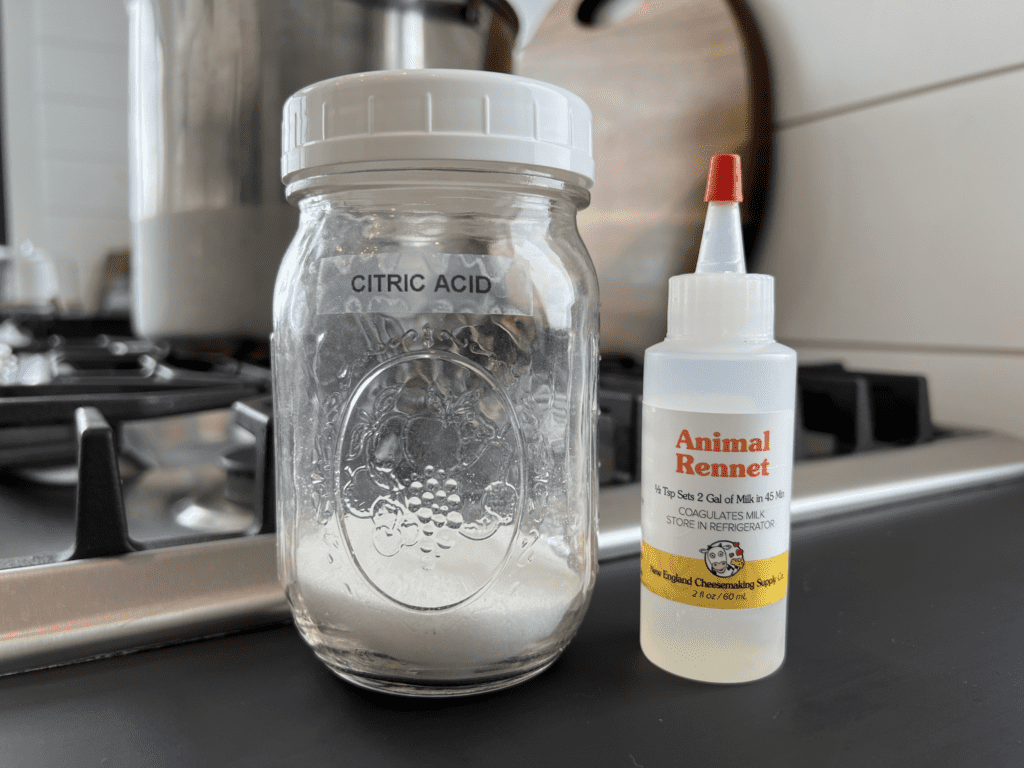
- While the milk is heating, prepare the rennet. Your rennet bottle should tell you how much rennet and water per gallon of milk. Mine says 1/2 tsp. of rennet per gallon of milk and I dilute this in 1/2 cup of cool water.
- When the milk comes to temperature, turn off the heat, add the diluted rennet, and stir in an up-and-down motion until the rennet has been evenly distributed.
- Cover the pot with a lid and set a timer for 15 minutes.
- When the timer goes off, remove the lid. The milk should now be set up. Use a large knife (I use a bread knife), to cut a grid pattern into the now-hardened curd. Aim for about 1” squares, but it definitely doesn’t have to be perfect. Then let it sit for another 5 minutes.
- Towards the end of that 5 minutes, turn your sink water on hot to heat up.
- After the 5 minutes is up you are going to use the spoon to gently stir the curds and cut the rest of it into 1-inch cubes. Again, don’t worry about perfection here.
- Next, you are going to drain the whey off of the curds. You can set a colander on a pot to save the whey for other things or to give to your chickens.
- Then, fill the pot with that hot water until it covers the curds, gently stirring it with your hands to break the curds apart.
- Dump the curds back into the colander a second time and this time you can just let the water go down the sink.
- Now we are going to add a little salt. Sprinkle 1 tsp. per gallon of milk over the curds and mix it in. After it is mixed well, ball the curds together as best you can and place the ball back into the pot.
- Let the pot fill up with hot water again until it covers the curds. Then take that pot back to the stove.
- Turn the stove back on to low heat. As the water heats up, the curds are going to more easily stick together and form a ball. If you have more than a gallon of milk that you started with, you may want to separate the large ball into two smaller balls.
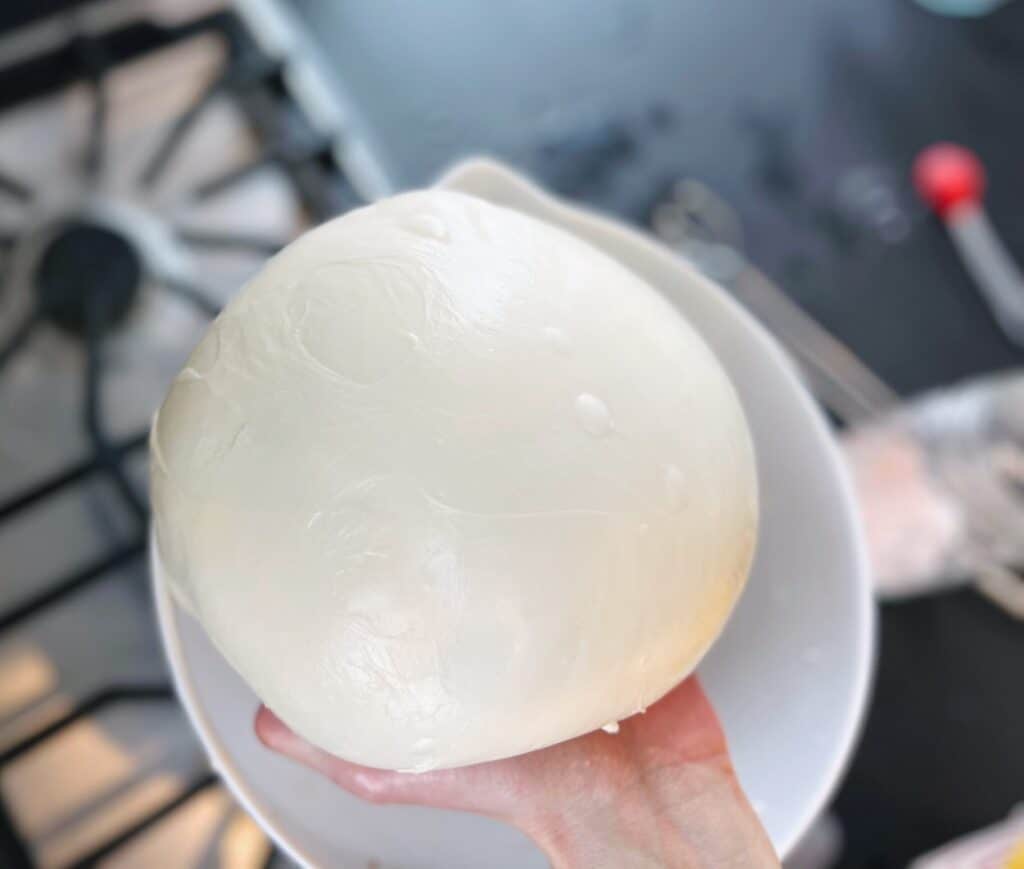
- Now it’s time for the fun part. Start picking up each ball with your hands and letting the cheese stretch down towards the water. Dip the whole ball back in, and repeat the process, this time grabbing another part of the ball. This is not an art, so don’t stress about technique here, you’re simply dipping it in hot water and letting it stretch out. This is going to give you that mozzarella consistency.
- The water should now be too hot to put your hands in. Taking tongs or whatever kitchen tool that will do the job (spoon works in a pinch), pick up the cheese ball and continue letting it stretch in the same way until it stretches easily without breaking and develops a glossy appearance. When you hit this point, you’re done!
- If you want to form it into cheese sticks or use it fresh, it’s ready to work with at this point. I usually add a little more salt to taste, stretch it into a tight ball (see video), cover, and refrigerate.
How to Store Mozzarella Cheese
Mozzarella cheese is incredibly adaptable and can be used right away for dishes like cheese sticks or enjoyed fresh. For any leftover cheese you might have, shape it into a smooth ball, season with a bit more salt if you prefer, cover it with plastic wrap, and keep it in the fridge. If you need to store it for a longer period, shredded mozzarella freezes exceptionally well, which is ideal for meal planning. This ensures that you always have a supply of tasty, homemade mozzarella ready for your recipes.
Recipe Substitutions and Variations
- Milk alternatives: While fresh milk or ultra-pasteurized milk is preferred for a rich texture, you can use skimmed milk for a lighter version. But skim milk may yield a slightly less creamy mozzarella. For the best results, use non-homogenized milk if possible.
- Citric acid substitutes: If you don’t have citric acid, use lemon juice or white vinegar. Use about 1/4 cup of lemon juice or vinegar per gallon of milk as a substitute. Adjust based on taste and acidity.
- Rennet alternatives: For those who prefer a vegetarian option, liquid rennet can be replaced with vegetable rennet or a lemon juice-based recipe. Follow the package instructions for equivalent amounts.
- Flavor variations: Experiment with herbs and spices by adding dried basil, oregano, or garlic powder to the curds before forming them into balls to infuse your mozzarella with extra flavor.
- For a firmer cheese, allow the curds to drain longer before shaping, and for a softer cheese, reduce the amount of rennet mixture slightly. You might also try a hot water bath for the cheese curds to achieve the desired consistency.
Save this recipe for later by pinning it!


The World’s Easiest Mozzarella Cheese Recipe and Tutorial
Ingredients
- 1 – 4 gallons of milk raw or store-bought, 2% or whole milk
- 1 ½ tsp. citric acid per gallon of milk
- ½ cup of water per gallon of milk for dissolving citric acid
- Rennet ½ tsp. per gallon of milk, diluted in ½ cup of cool water
- Salt 1 tsp. per gallon of milk
- Optional: Additional salt to taste
Instructions
- Add 1-4 gallons of milk to a large nonreactive pot.
- For every gallon of milk, dissolve 1-1/2 tsp. citric acid in 1/2 cup of water.
- Stir to combine. Then evenly add the dissolved citric acid to the milk.
- Stir the milk in an up-and-down motion to blend well.
- Turn the heat to med-low and slowly heat up the milk to 100 degrees F. Stir occasionally.
- While the milk is heating, prepare the rennet. Your rennet bottle should tell you how much rennet and water per gallon of milk. Mine says 1/2 tsp. of rennet per gallon of milk and I dilute this in 1/2 cup of cool water.
- When the milk comes to temperature, turn off the heat, add the diluted rennet, and stir in an up-and-down motion until the rennet has been evenly distributed.
- Cover the pot with a lid and set a timer for 15 minutes.
- When the timer goes off, remove the lid. The milk should now be set up. Use a large knife (I use a bread knife), to cut a grid pattern into the now-hardened curd. Aim for about 1” squares, but it definitely doesn’t have to be perfect. Then let it sit for another 5 minutes.
- Towards the end of that 5 minutes, turn your sink water on hot to heat up.
- After the 5 minutes is up you are going to use the spoon to gently stir the curds and cut the rest of it into 1-inch cubes. Again, don’t worry about perfection here.
- Next, you are going to drain the whey off of the curds. You can set a colander on a pot to save the whey for other things or to give to your chickens.
- Then, fill the pot with that hot water until it covers the curds, gently stirring it with your hands to break the curds apart.
- Dump the curds back into the colander a second time and this time you can just let the water go down the sink.
- Now we are going to add a little salt. Sprinkle 1 tsp. per gallon of milk over the curds and mix it in. After it is mixed well, ball the curds together as best you can and place the ball back into the pot.
- Let the pot fill up with hot water again until it covers the curds. Then take that pot back to the stove.
- Turn the stove back on to low heat. As the water heats up, the curds are going to more easily stick together and form a ball. If you have more than a gallon of milk that you started with, you may want to separate the large ball into two smaller ones.
- Now it’s time for the fun part. Start picking up each ball with your hands and letting the cheese stretch down towards the water. Dip the whole ball back in, and repeat the process, this time grabbing another part of the ball. This is not an art, so don’t stress about technique here, you are simply dipping it in hot water and letting it stretch out. This is going to give you that mozzarella consistency.
- The water should now be too hot to put your hands in. Taking tongs or whatever kitchen tool that will do the job, a spoon works in a pinch, you are going to pick up the cheese ball and continue letting it stretch in the same way until it stretches easily without breaking and develops a glossy appearance. When you hit this point, you are done!
- If you want to form it into cheese sticks or use it fresh, it’s ready to work with at this point. I usually add a little more salt to taste, stretch it into a tight ball (see video), cover, and refrigerate.
Video
Notes
Tips for Making Mozzarella Cheese
- Check for clean break: After adding rennet and letting the rennet mixture sit for 15 minutes, check if the curd has set by performing a "clean break" test with a knife. If it’s not ready, let it sit for another 10–20 minutes.
- Use hot water for stretching: After draining the excess whey, cover the curds with hot water to help them separate. Repeat this process before adding salt and forming the curds into a ball. Stretch the curds by dipping them into the hot water and pulling them until they reach a stretchy consistency with a glossy appearance.
- Gradually heat the milk: Heat the milk slowly to 100°F over medium heat, stirring occasionally to prevent scalding. Use an instant-read thermometer to monitor the temperature.
- Ensure you let the cheese curd set properly before cutting. If the curds are too fine and don't form large chunks, it may be because they didn’t set long enough.
FAQs
Why Were My Curds Really Fine and Didn’t Form into Large Chunks?
It’s possible that the cheese didn’t set up long enough before you cut the curds. Make sure to check the internal temperature of the curds to ensure proper setting.
Can Vinegar Be Used Instead of Rennet?
No, vinegar cannot be used as a substitute for rennet. It will produce a different texture, and you won’t achieve the desired consistency for mozzarella cheese.
What Type of Milk Is Best for Making Mozzarella Cheese?
Both raw milk and store-bought milk (2% or whole) are suitable for making mozzarella. For the best results, use milk with a good amount of butterfat. Non-homogenized milk is ideal for a more authentic taste, but skim milk can be used, though it may yield a less creamy cheese.
How Do I Know If My Curd Has Set Properly?
Perform a “clean break” test: Insert a knife into the curd. It should separate cleanly without a milky appearance. If the curds don’t meet this standard, let them sit a little longer until they firm up.
Can You Use Non-Dairy Milk to Make Mozzarella Cheese?
Non-dairy milk can be used, but it may not produce the same texture or meltability as traditional dairy milk due to differences in protein and fat content.
Why Did My Mozzarella Cheese Turn Out Rubbery?
Mozzarella can turn rubbery if it’s overcooked or if the curds are stretched too much. Ensure you’re stretching the cheese at the right temperature and avoid overheating it.
Is Mozzarella Cheese Safe to Eat During Pregnancy?
Yes, mozzarella cheese is safe to eat during pregnancy, as long as it is made from pasteurized milk. Pasteurization kills harmful bacteria that could pose a risk to you and your baby.
Are There Any Specific Precautions I Should Take When Consuming Mozzarella Cheese During Pregnancy?
Ensure the cheese is fresh and has been stored properly in an airtight container. Avoid consuming any cheese that looks or smells off. While mozzarella can be a nutritious addition to your diet, it should be enjoyed in moderation as part of a balanced diet.
Did you make this recipe?
Please leave a 5-star review so that others can try it as well! Mention us @thefromscratchfarmhouse on Instagram so we can see your creations! You can also leave a comment below!
For even more delicious recipes, you may like these:
Farmer’s Cheese {Beginner-Friendly Cheese Recipe & How To}

How to Make Thick and Creamy Yogurt in an Instant Pot
I’m attempting mozzarella cheese with 2% milk. Note on the bottle of rennet you use and the link you provide states “1/2 tsp per 2 gallons of milk” you say per 1 gallon. My curds didn’t come together. I’m experimenting though. Thanks
Hey there! Sorry to hear your curds didn’t come together. You’re right about the rennet – the bottle suggests 1/2 tsp per 2 gallons, so for 1 gallon, you’d use 1/4 tsp. It might help to double-check your measurements and make sure your milk isn’t ultra-pasteurized, as that can affect the curdling process. Keep experimenting, and you’ll get there! Happy cheese making!
Can vinegar be used instead of rennet?
No, it would have a different effect. You wouldn’t get the texture you are looking for with mozzarella.
I tried this recipe exactly and my curds were really fine, they didnt form into chunks. I was still able to form some of the fine curd into cheese (yay!) but lost a lot of it in the hot water and straining steps. What went wrong? How can I adjust for next time so my curds are larger?
My guess is that you just didn’t let the cheese set up long enough before cutting the curds. I added some information to the post on this. See the section on looking for a “clean break.”
Instead of citric acid, can I let the milk sit in room temperature to make it sour and then do the other steps?
I haven’t tried that, but I think it would have a different effect. If you do try it, please let me know how it goes!